Paper Wall Art: A Geometric 3D Piece for Your Wall
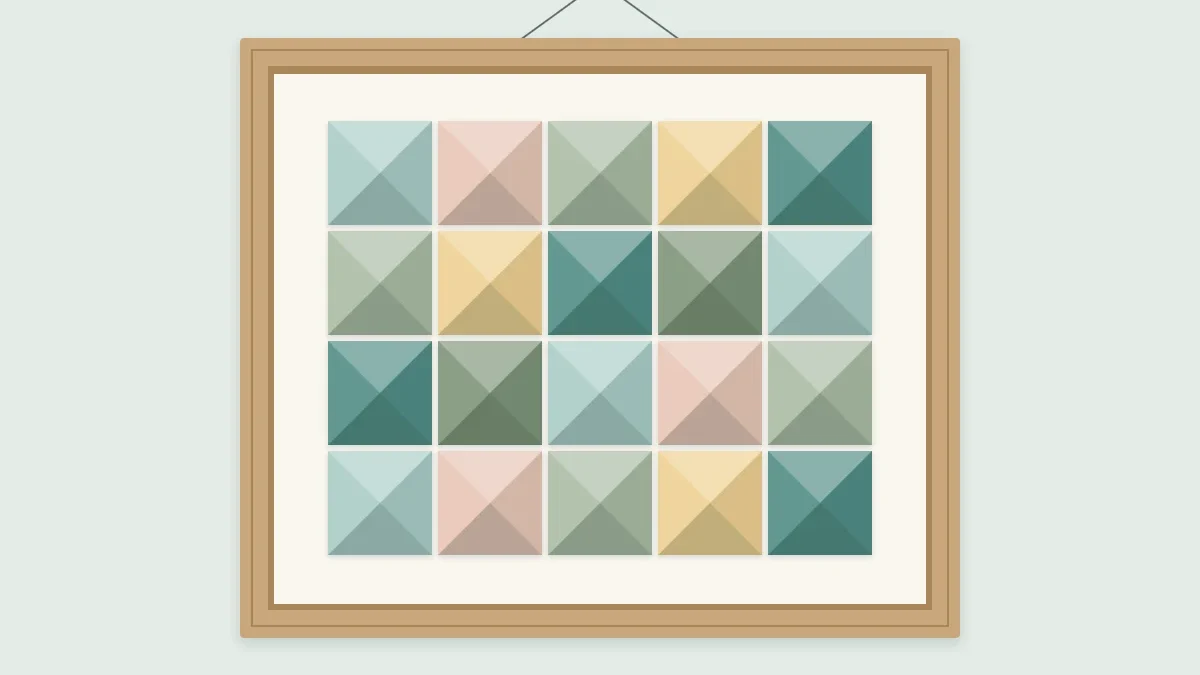
Sixteen low paper pyramids on a ruled board make a quiet relief that changes with the light. Each module needs two scored lines and one cut.
Project at a glance
Materials
- 3 US Letter sheets of cardstock, or one 12 × 12 in sheet, for the modules
- 1 backing board of mat board or heavy cardstock, 12 × 12 in (30.5 × 30.5 cm)
- Tacky glue
- 12 × 12 in shadow-box frame with at least 3/4 in (2 cm) of depth
Paper wall art does not have to mean a print behind glass. Paper holds a fold, and a fold catches light, so a sheet of plain cardstock can be turned into a low relief that changes through the day as the light moves across it. The piece described here is a grid of sixteen shallow pyramids on a 12 in (30.5 cm) square board. Every module is made the same way, from a square with two scored lines and a single cut, which makes this a steady, repetitive project that suits an unhurried evening.
How the module works
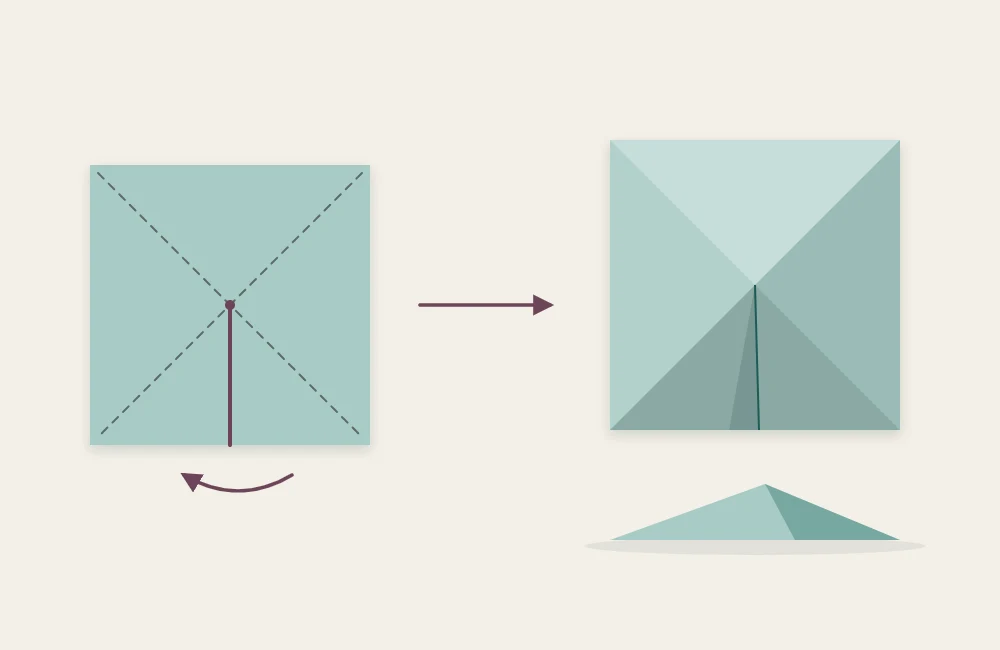
Each pyramid begins as a flat 3 in (7.6 cm) square. Scoring both diagonals divides it into four triangular faces. A flat square cannot rise into a point on its own, so one face is slit from the middle of its outer edge to the center, and the two sides of that slit are overlapped slightly and glued. Closing the gap pulls the center upward.
The amount of overlap controls the height. With a 1/4 in (6 mm) overlap at the outer edge, the peak should stand somewhere between 3/8 and 1/2 in (1 to 1.3 cm) high. More overlap gives a steeper pyramid and a smaller footprint. Because one side shortens, the base is no longer a perfect square: it becomes very slightly tapered, a little under 3 in across. That is intentional. On a 3 in grid, it leaves a fine, even shadow line between neighbors.
Choosing paper and colors
Use a smooth 65 to 80 lb (176 to 216 gsm) cardstock that is colored all the way through. Papers with a white core show a pale line wherever they are scored or cut. A matte surface is kinder than a glossy one, which highlights every fingerprint and glue smear.
Three related colors work well for sixteen modules: a US Letter sheet yields six 3 in squares, so three sheets give eighteen, with two spare for practice. A single 12 × 12 in sheet yields exactly sixteen if you prefer one color and let the shadows do all the work. For the backing, choose mat board or heavy cardstock in a neutral tone that will show in the gaps.
Make the sixteen modules
- Cut the squares. Rule and cut sixteen squares, each 3 × 3 in (7.6 × 7.6 cm). Accuracy matters more here than anywhere else in the project, so use a knife and metal ruler or a paper trimmer.
- Score both diagonals. Lay a ruler from corner to corner and score on the face that will show, then repeat for the other diagonal. If your scored lines crack or wander, the article on scoring cardstock for crisp folds covers pressure and tools.
- Make the single cut. Find the midpoint of one edge, 1.5 in (3.8 cm) from either corner, and cut in a straight line from that point to the exact center where the diagonals cross. Stop at the center.
- Pre-fold the faces. Fold each diagonal back, away from the scored face, so the lines become ridges. Open the square out again; it will now want to lift.
- Glue the overlap. Put a very small amount of tacky glue along one side of the cut. Slide the other side over it until the two overlap by 1/4 in (6 mm) at the outer edge, tapering to nothing at the peak. Hold for half a minute.
- Check the first one, then repeat. Set the finished module on the table. All four corners should touch the surface. If it rocks, the overlap is uneven. Once one module sits flat, make the rest to match, using the first as a gauge.
Tip
Cut a small scrap of card 1/4 in (6 mm) wide and use it as an overlap gauge. Matching every module to the same gauge keeps the heights consistent across the grid.
Rule the board and mount the grid
- Rule the backing board. Cut the board to 12 × 12 in (30.5 × 30.5 cm). In light pencil, draw lines every 3 in (7.6 cm) in both directions to make sixteen cells.
- Arrange everything dry. Place all sixteen modules in their cells without glue. Decide where each color goes and which way each glued seam faces. Stand back and look before committing.
- Glue one module at a time. Lift a module, put a tiny dot of glue under each of its four corners, and set it back, centered in its cell. Work from the middle outward so small errors do not accumulate at one edge.
- Erase and leave to dry. Once the glue has set, remove any visible pencil with a soft eraser and leave the board flat for an hour.
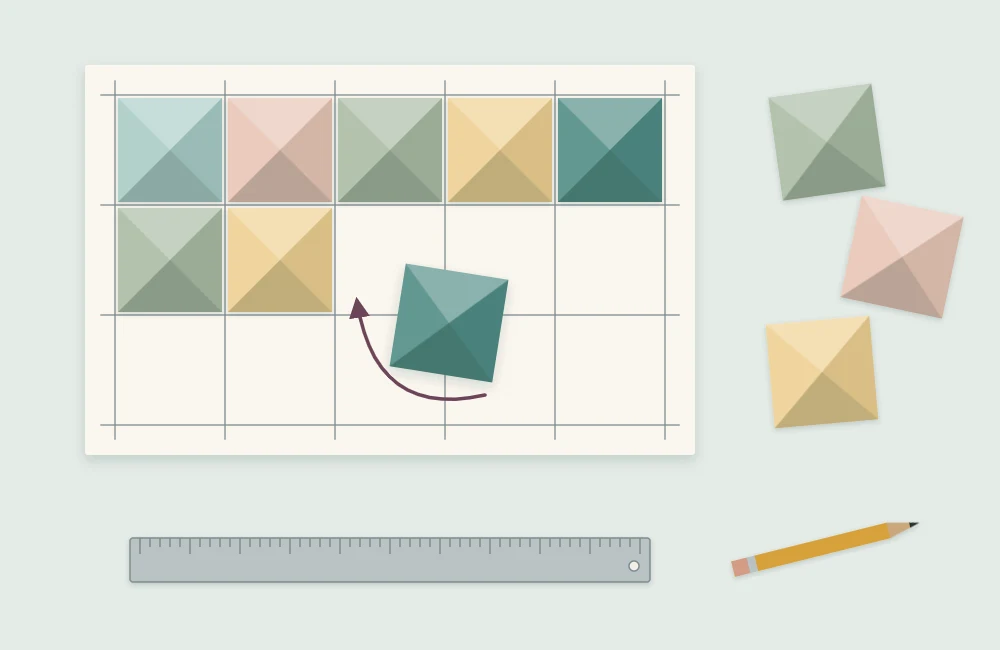
Corner dots are enough to hold a piece that will hang undisturbed, and they keep moisture away from the faces. The guide to choosing an adhesive for paper explains why a thick tacky glue grabs faster than a thin white glue in a spot like this.
Pattern, direction and light
Because each module has one slightly shorter side, its orientation is a design decision. Point every seam the same way and the grid looks orderly and quiet. Rotate alternate modules by a quarter turn and a subtle checkerboard appears in the shadows. Arranging colors in diagonal bands gives movement; a random scatter of three tones reads as texture.
Relief depends on side light. A wall beside a window, or one lit by a lamp from an angle, will show the faces as distinct tones. Flat frontal light erases most of the effect.
Framing and hanging
The piece needs depth in front of it. A 12 × 12 in shadow-box frame with at least 3/4 in (2 cm) of clearance protects the peaks from dust and knocks. An ordinary frame can be used with the glazing removed, although the paper will then need occasional dusting with a soft dry brush. Keep it out of direct sun, which fades most dyed papers, and away from kitchens and bathrooms, where humidity softens folds.
If something looks off
- Peaks at different heights. The overlaps vary. Use a gauge, and remake the worst offenders rather than forcing them.
- A crumpled tip. The cut ran past the center, or the faces were not pre-folded before gluing.
- Rows drifting out of line. Modules were placed by eye instead of centered in their cells.
- Shiny patches on the faces. Glue on fingertips. Keep a damp cloth and a dry one beside you. More fixes are collected in the guide to common paper craft mistakes.
Once the basic grid is familiar, the same module scales easily. Twenty-five 2 in squares fit a 10 in board for a finer texture, and the stepped depth of a layered shadow-box scene is a natural next project for the same frame.
Frequently asked questions
How tall are the pyramids?
With a 1/4 inch (6 mm) overlap on a 3 inch square, each peak should stand roughly 3/8 to 1/2 inch (1 to 1.3 cm) high. A larger overlap makes a steeper pyramid with a smaller base, so test on scrap before cutting all sixteen.
Do I need a shadow-box frame?
The piece needs clearance in front of it, so a standard frame with the glass in place will crush the peaks. Use a shadow box with at least 3/4 inch (2 cm) of depth, or an ordinary frame with the glazing removed.
Can I make it larger?
Yes. Keep the module the same and add rows, or scale the square up. Whatever size you choose, rule the backing board in cells equal to the flat square so the gaps between modules stay even.