Paper Christmas Ornaments: Two Designs From Strips and Circles
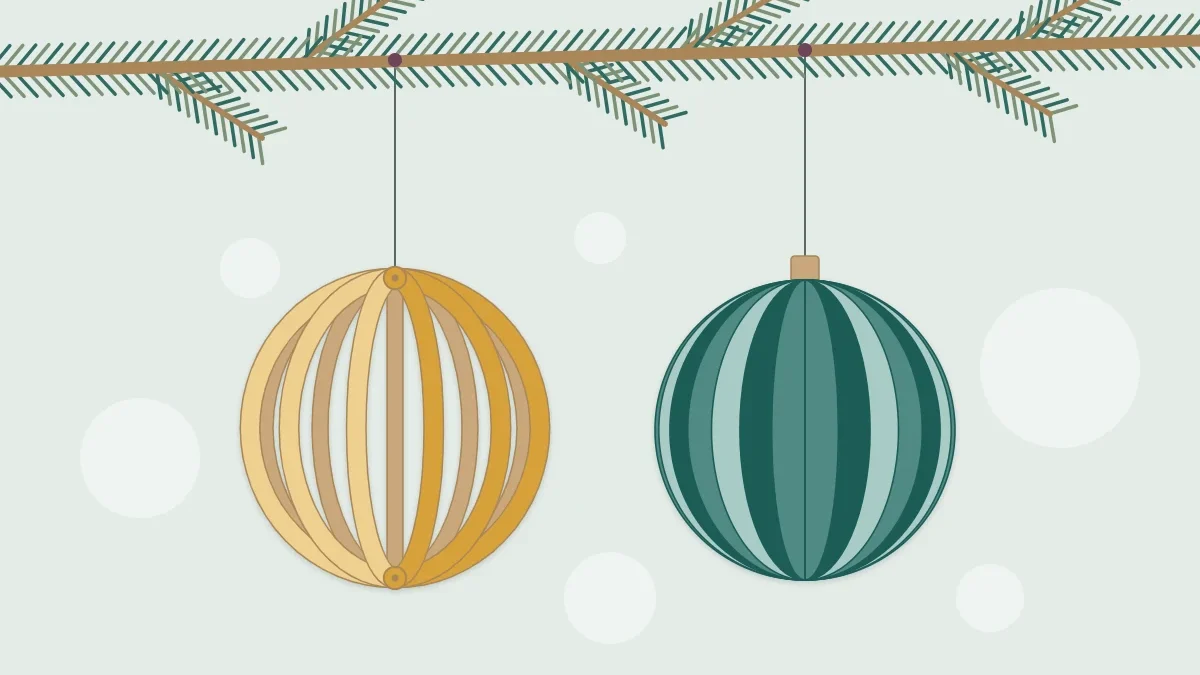
Two light, unbreakable ornaments from the simplest shapes: an open sphere made of cardstock strips and a ribbed bauble made of folded circles.
Project at a glance
Materials
- 10 cardstock strips, 1/2 x 6 in (1.3 x 15 cm), for the sphere
- 2 mini brads
- 12 paper circles, 2.5 in (6.4 cm) in diameter, for the bauble
- Glue stick
- Tacky liquid glue for the joining dots
- Thread for hanging loops
Paper Christmas ornaments have a few practical advantages over glass: they weigh almost nothing, they survive a fall from the tree, and they can be made in whatever colors suit the room this year. The two designs here use only the simplest shapes. One is an open sphere made from narrow strips, the other a full, ribbed bauble made from folded circles. Both are quick enough to make in batches, and they look best in a restrained palette of two or three colors.
Paper, Tools and Color
The two designs call for different weights. The strip sphere depends on springiness, so use cardstock of about 65 lb (176 gsm); thin paper sags and the sphere loses its shape. The folded-circle bauble needs the opposite, a paper that folds flat without bulk, so text-weight paper of 24 to 32 lb (90 to 120 gsm) or thin scrapbook paper is better. Double-sided paper is worth seeking out for both, because both faces show.
A paper trimmer makes even strips far easier than scissors, and a circle punch or circle cutter speeds up the bauble considerably. Neither is essential; a ruler, a pencil, a jar lid to trace and steady cutting will do. If you are deciding what is worth buying, the overview of essential and optional tools sets out the order to add them.
Design A: A Sphere From Paper Strips
Ten strips are stacked, fastened at both ends and fanned out like the lines of longitude on a globe. The finished sphere is roughly 3.5 in (9 cm) across.
- Cut the strips. Cut ten strips of cardstock, each 1/2 × 6 in (1.3 × 15 cm). Keep the widths consistent; uneven strips are the first thing the eye notices.
- Punch both ends. Punch a small hole centered 1/4 in (6 mm) from each end of every strip. Punch one strip first and use it as a template for the others so the holes line up through the stack.
- Fasten the first end. Stack the strips neatly and push a mini brad through the holes at one end. Open the prongs flat against the back. Leave it firm but not tight, since the strips need to pivot.
- Fasten the second end. Put a second brad through the other end in the same way. Before opening its prongs, catch a loop of thread about 8 in (20 cm) long under the brad head for hanging.
- Fan the strips. Hold the stack by both ends and push them gently toward each other so the strips bow outward. Slide the strips around one at a time, top one to the left, next to the right, until they are spread evenly around the full circle.
- Even out the spacing. Turn the sphere and adjust each strip until the gaps match. Press the brad prongs down more firmly once the shape is right.
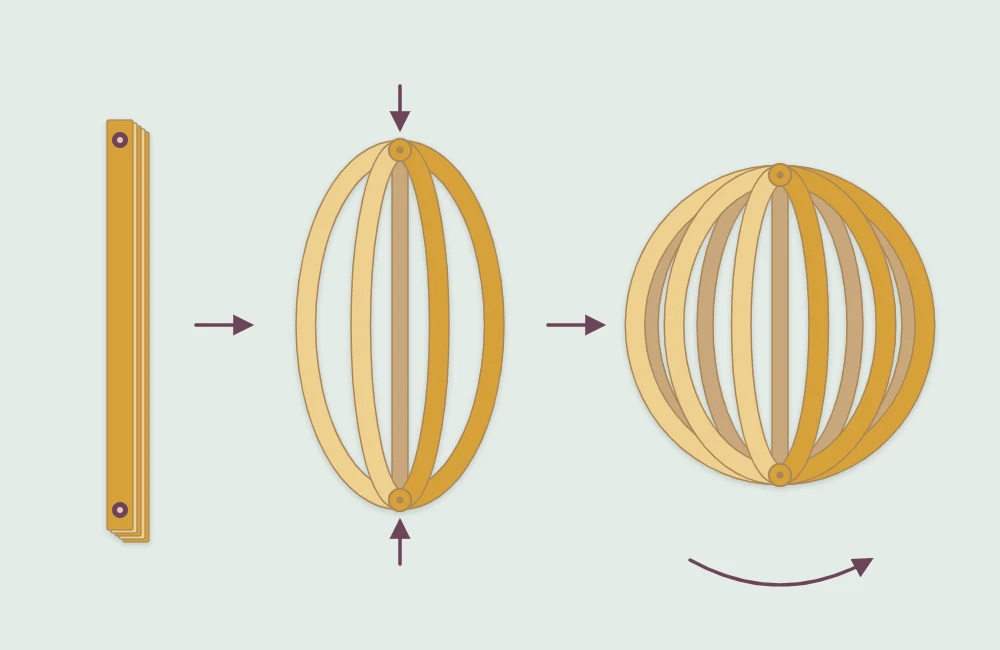
If the sphere tends to relax back into a flat bundle, fix the distance between the two ends. Tie a thread to one brad on the inside, run it through the middle of the sphere, and tie it to the other brad so the ends sit about 3.5 in (9 cm) apart. The thread is nearly invisible and holds the shape for good.
Tip
No brads on hand? Thread a needle with strong thread, knot it around a small bead, and pass it through the holes at one end, through the middle, and out through the other end. A second bead and a knot at the top hold the strips, and the leftover thread becomes the hanging loop.
Design B: A Bauble From Folded Circles
Twelve circles are folded in half and glued together half to half, like the pages of a round book that opens all the way around. Small dots of glue between the pages, placed alternately high and low, pull them into a honeycomb pattern. The bauble is 2.5 in (6.4 cm) across.
- Cut twelve circles. Punch or cut twelve circles 2.5 in (6.4 cm) in diameter. Use an even number so the alternating pattern closes neatly at the end. Two colors, six of each, work well.
- Fold each in half. Fold every circle exactly in half, colored side in, and press the crease firmly with a fingernail or bone folder.
- Glue the halves into a stack. Apply glue stick to one outer half of a folded circle and press the outer half of the next folded circle onto it, with the folds and curved edges aligned. Continue until all twelve are joined in one stack, alternating colors if you are using two.
- Add the hanging loop. Fold a 10 in (25 cm) thread in half and knot the ends. Lay it along the spine of the stack with the loop extending past the top.
- Close the round. Glue the last free half to the first, trapping the thread in the center. You now have twelve double-layered fins radiating from a central spine.
- Join the fins alternately. Put a tiny dot of liquid glue near the outer edge of one fin, about a third of the way down from the top, and press it to its neighbor. Join the next pair about a third of the way up from the bottom. Carry on around, alternating high and low, and hold each dot for a few seconds.
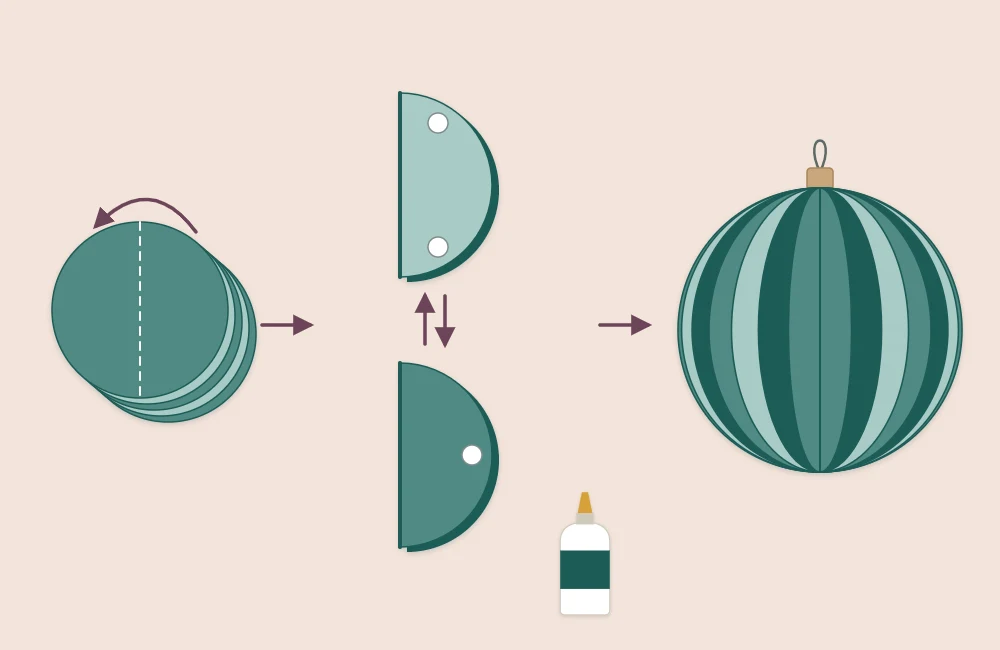
The alternating dots are optional. Without them the bauble is a simple ribbed sphere, which suits patterned paper, while the honeycomb version shows off solid colors. A fast-grabbing tacky glue makes the dot stage much less fiddly; the guide to adhesives for different paper jobs compares the options.
Common Problems
- The sphere is lopsided. The holes are not the same distance from the ends on every strip. Re-punch using a single template strip.
- Strips crease instead of curving. The cardstock is too heavy or was bent sharply while fanning. Draw each strip over the edge of a table first to give it a gentle curve.
- The bauble will not open evenly. Glue has crept into the fold. Keep glue stick about 1/8 in (3 mm) away from the crease.
Variations and Storage
Change the scale by changing one number. Strips of 8 in (20 cm) give a sphere of about 4.5 in (11.5 cm), and twenty circles instead of twelve make a denser, rounder bauble.
Smaller versions can be strung along a mantel using the methods in the paper garland tutorial, and both designs pair well with six-point paper snowflakes in a window. After the season, store both kinds loosely in a box with tissue between them, and avoid stacking anything on top. A strip sphere that has been squashed can usually be re-fanned; a crushed bauble is quicker to remake than to repair.
Frequently asked questions
What paper is best for paper ornaments?
It depends on the design. Strip spheres need springy cardstock of about 65 lb (176 gsm) so the strips hold a curve. Folded-circle baubles need thinner text-weight paper that folds flat without bulk.
How do I keep a paper strip sphere from collapsing?
Tie a thread between the two fasteners through the middle of the sphere so the ends stay a fixed distance apart. Pressing the brad prongs down firmly once the strips are evenly spaced also helps.
How many circles do I need for a folded paper bauble?
Twelve circles make a well-filled bauble at 2.5 in (6.4 cm). Use an even number if you plan to add the alternating glue dots, so the high and low pattern meets up when you come back around.