How to Make a Paper Garland: Circles, Flags and Geometric Shapes
Three ways to make a paper garland about six feet long: glued or sewn circles, folded flags on twine and simple geometric shapes.

Project at a glance
Materials
- Cardstock, US Letter or A4: about 3 sheets for a 6 ft (1.8 m) circle garland, 7 sheets for a flag garland
- Strong cotton or linen thread, about 88 in (2.2 m), for circles and shapes
- Thin twine, about 88 in (2.2 m), for flags
- Glue stick
- Low-tack tape to hold the thread while gluing
- Removable adhesive hooks for hanging
A paper garland is one of the few decorations that looks better the simpler it is. A single line of repeated shapes in two or three colors, hung in a loose swag across a shelf or a window, changes a room without filling it. The instructions below make a garland about 6 ft (1.8 m) long in each style; lengthen or shorten it by adding or removing shapes.
Planning Length, Color and Paper
Measure the place the garland will hang, then add about a fifth for the drape. A straight span of 5 ft (1.5 m) takes a 6 ft (1.8 m) garland comfortably. Add a further 8 in (20 cm) of bare thread or twine at each end for tying.
Cardstock around 65 lb (176 gsm) is the right weight. It hangs flat, resists curling and is still easy to cut and punch. Since garlands turn and are seen from both sides, choose paper that is solid-colored through its core or printed on both faces. Two or three colors repeated in a fixed order usually look calmer than a random mix.
A circle punch makes quick work of the first version, but a template and scissors do the job well. For help with smooth curves and repeated shapes, see the article on cutting with scissors and a craft knife.
Version 1: Circles on a Thread
Here the circles are glued in pairs with the thread sandwiched between them, so the garland is finished on both sides and nothing can slide along the line. Each circle is 2 in (5 cm) across, with a 1 in (2.5 cm) gap between neighbors. That makes 3 in (7.6 cm) per position, so 6 ft (72 in, or about 1.8 m) holds 24 positions and needs 48 circles.
- Cut the circles. Punch or cut 48 circles 2 in (5 cm) in diameter. If cutting by hand, trace around a template on the back of the paper and cut just inside the line.
- Cut the thread. Cut a piece of strong cotton or linen thread about 88 in (2.2 m) long. This allows 72 in (1.8 m) for the circles and 8 in (20 cm) spare at each end.
- Lay out the first half. Place 24 circles face down in a line on the table with 1 in (2.5 cm) between them. A strip of card cut 1 in (2.5 cm) wide makes a quick spacer.
- Position the thread. Tape one end of the thread to the table, 8 in (20 cm) before the first circle. Pull it straight across the centers of all the circles and tape the other end down so it stays taut.
- Glue the pairs. Coat the back of a second circle with glue stick, right to the edge, and press it onto the first circle in the line, trapping the thread. Repeat along the row.
- Press and release. Run a fingertip firmly around each pair, particularly beside the thread, then leave the garland for a few minutes before lifting the tape.
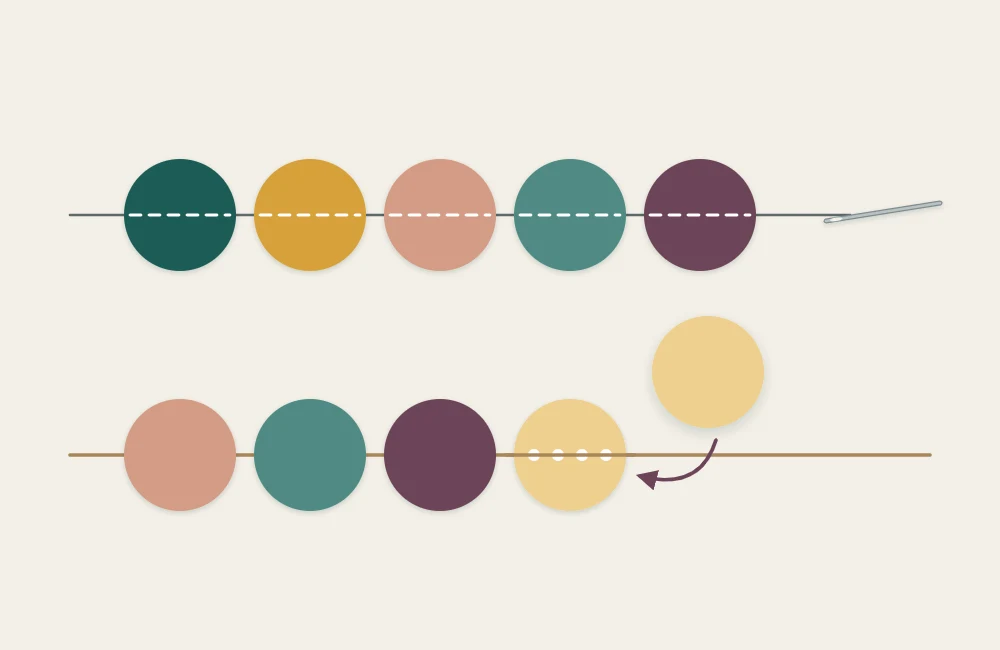
The sewn alternative. If you have a sewing machine, single circles can be stitched into a chain instead. Set a long straight stitch, pull out 8 in (20 cm) of thread before starting, and feed the circles under the foot one after another, sewing straight across the center of each and letting the machine run a few stitches in the gap between them. Use an old needle, since paper dulls it.
Version 2: Folded Flags on Twine
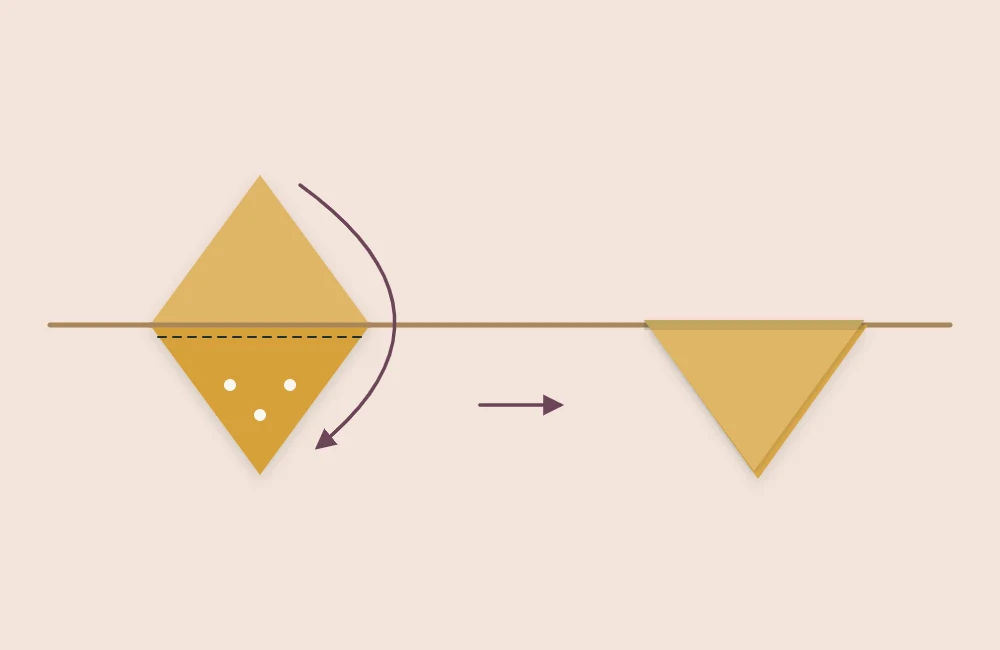
Each flag begins as a diamond that folds in half over the twine to make a triangle pennant 3 in (7.6 cm) wide and 4 in (10 cm) deep. With a 1/2 in (1.3 cm) gap between flags, about 20 flags fill 6 ft (1.8 m).
- Cut the rectangles. Cut 20 rectangles 3 x 8 in (7.6 x 20.3 cm). With the 8 in (20.3 cm) side running across the width of a US Letter or A4 sheet, each sheet gives three, so 20 flags take seven sheets.
- Mark the midpoints. On the back of each rectangle, make a small tick at the center of all four sides: 1 1/2 in (3.8 cm) along the short sides and 4 in (10 cm) along the long sides.
- Cut the diamond. Cut in straight lines from tick to tick, removing the four corners. The diamond is 3 in (7.6 cm) wide and 8 in (20.3 cm) tall.
- Score and fold. Score across the diamond at its widest point, between the two side corners, and fold it in half so the two long points meet.
- Glue over the twine. Cut a piece of twine about 88 in (2.2 m) long. Open a flag, apply glue stick to one half of the inside, lay the twine into the fold and close the flag, pressing the halves together.
- Continue along the line. Add the remaining flags at 1/2 in (1.3 cm) intervals, checking that every fold sits snugly against the twine.
Version 3: Other Geometric Shapes
Any flat shape can be hung by the sandwich method from Version 1. Hexagons, squares turned on their points, and half circles all work well. Cut the shapes in pairs, lay the thread across one, and glue its partner on top. Two points are worth keeping in mind. First, place the thread above the middle of each shape, roughly a third of the way down from the top, so the shape hangs upright instead of tipping forward. Second, keep the sizes modest, around 2 to 3 in (5 to 7.6 cm), since large flat pieces catch drafts and tangle.
Hanging It
Tie a small loop in each end of the thread and hang the loops from removable adhesive hooks, picture nails or the ends of a curtain rod. Let the middle drop a few inches below the ends.
Watch out
Paper burns easily. Hang garlands well away from candles, fireplaces, stove tops and hot light bulbs, and never above an open flame. The NFPA provides general guidance on candle safety at home.
Troubleshooting
- Shapes spin to show their edges. The thread has twist in it. Let the garland hang freely from one end for a minute before fixing the other.
- Circles peel apart. The glue did not reach the edges or the thread is too thick to bridge. Use finer thread, or switch to a thin line of liquid glue. See which adhesive suits which job.
Variations and Storage
Graduate the colors from dark to light along the length for a quiet ombre effect. Alternate large and small circles. Hang short lengths vertically, weighted with a slightly larger shape at the bottom, to make a curtain of strands in a window. For something with more depth, tie small accordion-fold rosettes into the line at intervals, or adapt the shapes for winter with ideas from strip and circle ornaments.
Frequently asked questions
How many shapes do I need for a paper garland?
Add the width of one shape to the gap you want, then divide the garland length by that figure. For 2 in circles with 1 in gaps on a 6 ft garland, that is 24 positions, or 48 circles if they are glued in pairs.
What string is best for a paper garland?
Strong cotton or linen thread suits small, light shapes glued in pairs. Thin twine works better for folded flags, where it sits inside the fold.
Can I make a garland without a sewing machine?
Yes. Glue the shapes back to back in pairs with the thread sandwiched between them. The result is double-sided and the shapes cannot slide out of position.