How to Make Paper Rosettes (Accordion-Fold Medallions)
Fold a long strip into even pleats, join it into a ring and press it flat. Here is how strip width and length set the size of a paper rosette.

Project at a glance
Materials
- One US Letter or A4 sheet of paper for the pleated strip
- Cardstock scrap for two center discs
- Thick white tacky glue
- Thread for hanging (optional)
Paper rosettes turn a plain strip into a pleated medallion with nothing more than a row of folds and two small discs of card. They are sometimes called accordion-fold medallions or pleated fans, and they earn their place in a paper crafter’s repertoire because they scale so easily: the same method makes a 2 in (5 cm) gift topper or a 12 in (30 cm) wall piece. This tutorial builds a rosette about 3 in (7.6 cm) across, then shows how to resize it.
The Proportions That Matter
Two measurements decide everything about a rosette.
Strip width sets the diameter. When the pleated ring is pressed flat, the strip’s width becomes the radius. A strip 1 1/2 in (3.8 cm) wide gives a rosette about 3 in (7.6 cm) across.
Strip length sets the fullness. The strip has to reach all the way around the outer edge and still have enough left over to stay pleated. A length of roughly eight times the width is about the minimum; much less and the rosette will not flatten without tearing at the center. Longer strips give deeper, more closely packed pleats. The rosette here uses about fourteen times the width, which gives a full, firm result.
| Finished size (approx.) | Strip width | Total strip length | Fold spacing |
|---|---|---|---|
| 2 in (5 cm) | 1 in (2.5 cm) | About 17 in (43 cm) | 3/8 in (1 cm) |
| 3 in (7.6 cm) | 1 1/2 in (3.8 cm) | 22 in (56 cm) | 1/2 in (1.3 cm) |
| 4 in (10 cm) | 2 in (5 cm) | About 33 in (84 cm) | 5/8 in (1.6 cm) |
Treat the table as a starting point and test on scrap; paper thickness changes how tightly the pleats pack.
Paper Notes
Rosettes work in almost any paper from text weight, around 24 lb (90 gsm), up to 65 lb (176 gsm) cardstock. Lighter paper folds without scoring and suits small rosettes. Cardstock holds its shape better at larger sizes but must be scored, or the pleats will be uneven and the folds may crack. Paper that is colored or patterned on both sides looks best, because the inside of every pleat shows a little.
No sheet is long enough to give the strip in one piece, so it is made from two or three shorter strips joined end to end. The joins disappear inside the pleats.
Making a 3 in Rosette
- Cut two strips. Cut two strips 1 1/2 x 11 in (3.8 x 28 cm) along the long side of a US Letter sheet. On A4, cut them the full 11 3/4 in (29.7 cm) and trim any partial pleat later.
- Mark the folds. Along both long edges of each strip, make light pencil ticks every 1/2 in (1.3 cm), measuring from the same end.
- Score every line. Lay a ruler between each pair of ticks and score across the strip. Keep the lines square to the edge; a slanted score produces a rosette that spirals instead of lying flat. The method is explained in the guide to scoring and folding.
- Fold back and forth. Fold along the first score, turn the strip over and fold along the next, and continue to the end so the folds alternate direction. Sharpen each one by pinching the stack and running a bone folder along it.
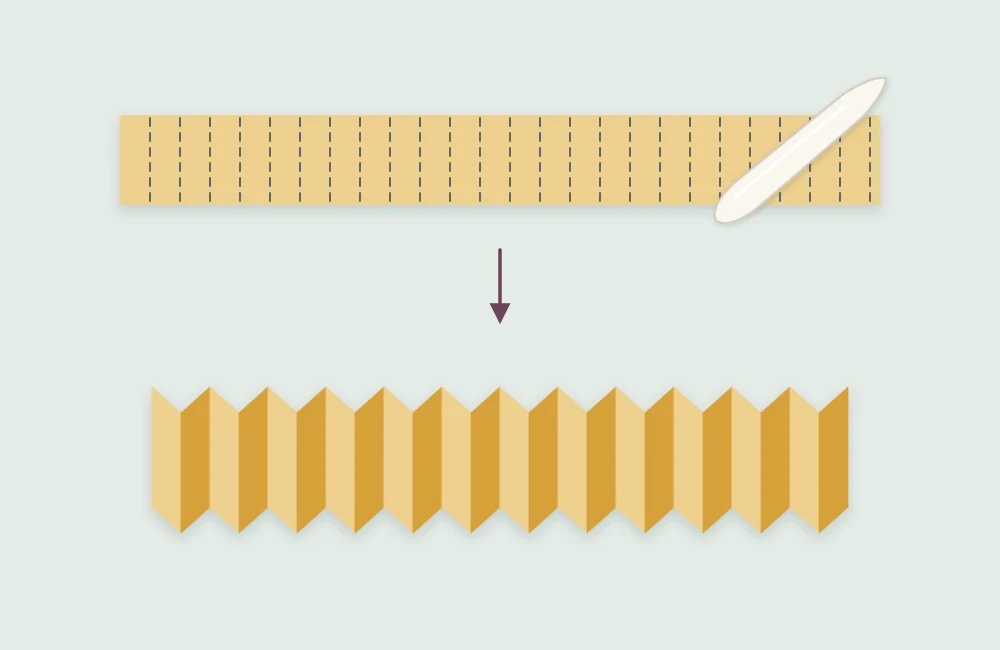
- Join the strips. Glue the last panel of one strip over the first panel of the other, making sure the folds on either side of the join continue to alternate. You now have one long pleated strip.
- Close the ring. Bring the two free ends together and overlap one panel onto the other in the same way. If the folds at the join both point the same direction, trim one panel off an end so they nest. Glue and hold until secure. The result is a pleated tube.
- Cut two center discs. From cardstock, cut one circle about 1 in (2.5 cm) across for the front and one about 1 1/2 in (3.8 cm) across for the back.
- Flatten the ring. Stand the tube on the table. Gather the top edge inward with your fingertips while pressing down, so the top edge closes to a point at the center and the bottom edge spreads into the outer rim. Keep one hand on it; it will spring back up if released.
- Fix the back disc. Spread a generous layer of thick tacky glue over the larger disc, press it onto the center of the flattened rosette and hold it firmly, or weight it with a small heavy object, until the glue grips.
- Add the front disc. Turn the rosette over and glue the smaller disc to the center of the front to cover the meeting point of the pleats.

Getting the Center to Hold
The flattened pleats push outward, so the adhesive at the center has real work to do. A glue stick is not strong enough. Thick white tacky glue works well if the rosette is held or weighted while it grabs. The comparison of adhesives for paper projects covers the trade-offs.
Tip
Glue the back disc first. Once the back is secure, the rosette stays flat on its own and the front disc can be placed carefully and centered by eye without a struggle.
If Something Goes Wrong
- The center tears as you flatten it. The strip is too short for its width. Add another section of pleated strip to the ring.
- The rosette domes instead of lying flat. There are too many pleats for the size. Remove a few panels and rejoin the ring.
- The pleats twist to one side. The score lines are not square to the strip edge. Mark both edges before scoring the next strip.
- The ring will not close neatly. There is an odd number of panels. Trim a single panel from one end.
Shaping the Edge and Layering
The outer rim is the easiest place to add interest. Before folding, trim one long edge of the strip with decorative-edge scissors, or after folding, snip the corner off each pleat at the outer edge while the strip is still stacked. Cutting the corners at an angle gives a pointed, star-like rim; rounding them gives scallops.
Layering works well too. Glue a 2 in (5 cm) rosette to the center of a 4 in (10 cm) one in a second color, and finish with a single disc on top.
Ways to Use Them
A group of rosettes in three sizes makes a simple wall arrangement: fix each to the wall with removable adhesive putty on its back disc. Add a loop of thread behind the back disc before the glue sets and a rosette becomes a hanging ornament, or string several together as a paper garland. Small ones, made from 1 in (2.5 cm) strips, sit neatly on a wrapped box in place of a ribbon bow; there are more ideas of that kind in paper tags, bows and bands for gifts.
Frequently asked questions
How long should the strip be for a paper rosette?
As a rule of thumb, at least eight times the strip's width, and more for deeper pleats. A 1 1/2 in wide strip about 22 in long makes a full rosette roughly 3 in across.
Why won't my rosette stay flat?
The pleats push outward, so the center needs a strong adhesive and time to grip. Use thick tacky glue on a card disc at the back and hold or weight the rosette until it holds.
Do I need to score the folds?
Text-weight paper folds well without scoring. Cardstock should be scored on every fold line so the pleats are even and the folds do not crack.