How to Cut Paper Snowflakes With True Six-Point Symmetry
Real snow crystals have six sides, and one fold makes the difference. Fold a square into a 60° wedge, plan the cuts, and open out a snowflake with six true points.

Project at a glance
Materials
- 1 sheet of copy paper per snowflake, trimmed to an 8.5 in (21.6 cm) square
- Removable adhesive or thread for display
Most paper snowflakes have four or eight points, because folding a square in half, and in half again, is the obvious thing to do. Real snow crystals are six-sided, and the eye knows it: a six-point snowflake reads as snow, while an eight-point one reads as a doily. The difference lies entirely in one fold. Fold the paper into thirds around its center instead of halves, and every cut repeats six times around the design.
Why Six Points
Ice crystals grow in a hexagonal pattern, which is why natural snowflakes have six sides or six arms; NOAA’s explanation of how snowflakes form covers the science. On paper, six-fold symmetry means dividing the full circle around the center into six equal parts of 60° each. A square folded once on the diagonal gives a triangle with 180° at the middle of its long edge. Folding that into three equal sections produces the 60° wedge, and everything else follows from it.
Paper and Scissors
Thin paper is essential, because the wedge is six layers thick. Ordinary 20 lb (75 gsm) copy paper is ideal: it cuts cleanly in a stack and is stiff enough to hold its shape in a window. Cardstock is too thick to cut through six layers, and tissue paper tends to tear when the snowflake is unfolded. The broader guide to paper weights and what they suit is useful if you want to try something other than white copy paper.
Use small, sharp scissors with fine points. Large scissors cannot turn inside tight shapes, and blunt ones chew the inner layers instead of cutting them.
Folding the 60° Wedge
- Make a square. Fold one short edge of a US Letter sheet over to lie along a long edge, crease, and cut off the leftover strip. Unfolded, this gives a square of 8.5 in (21.6 cm). An A4 sheet gives a 21 cm square in the same way.
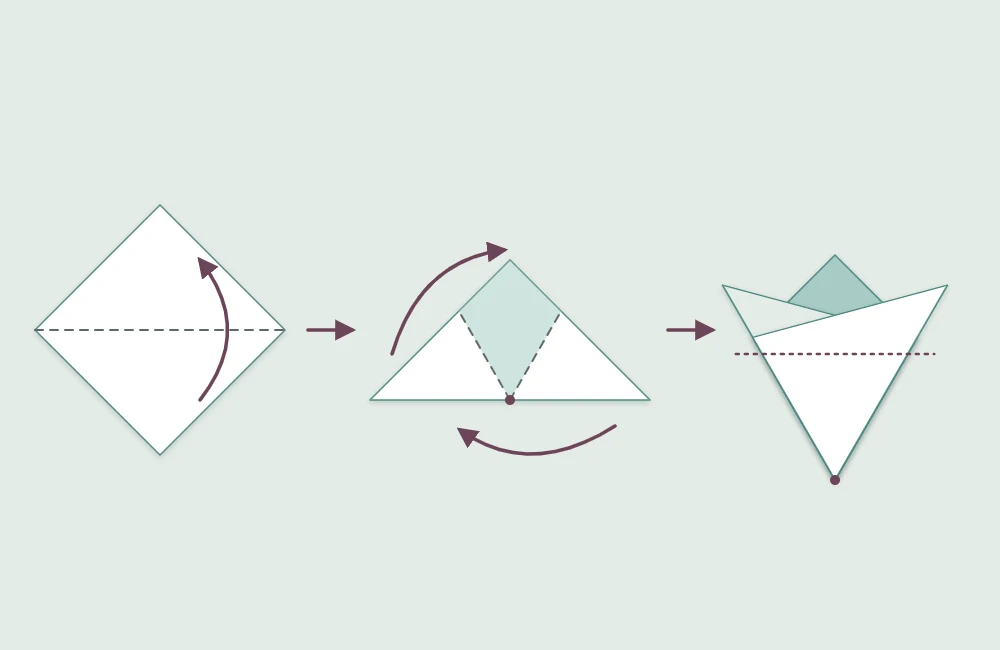
- Fold the triangle. Fold the square in half along the diagonal. Turn it so the long folded edge is nearest you and the right-angle corner points away.
- Mark the center. Bring the two sharp corners together and pinch only the folded edge to make a small mark at its midpoint, then open back to the triangle. This mark is the center of the snowflake, and every later fold pivots on it.
- Fold the right third. Swing the right-hand corner up and across to the left, pivoting at the center mark, so the right third of the triangle lies over the middle. Do not crease yet.
- Fold the left third. Swing the left-hand corner up and across to the right in the same way, on top of the first flap.
- Equalize, then crease. Adjust both flaps until the three sections match: the lower edge of each flap should lie exactly along the fold of the other, and the shape should come to a sharp point at the center mark. When it does, press both creases firmly.
- Trim the top. The wedge now has uneven points sticking up at the wide end. Cut straight across, below the lowest of them, so that every layer is the same length. What remains is a 60° wedge with a folded edge on each long side.
Tip
Fold the thirds loosely and nudge them into agreement before pressing any crease. A wedge that is slightly unequal produces a snowflake with arms of different widths, and the error cannot be corrected once the paper is cut.
Planning the Cuts
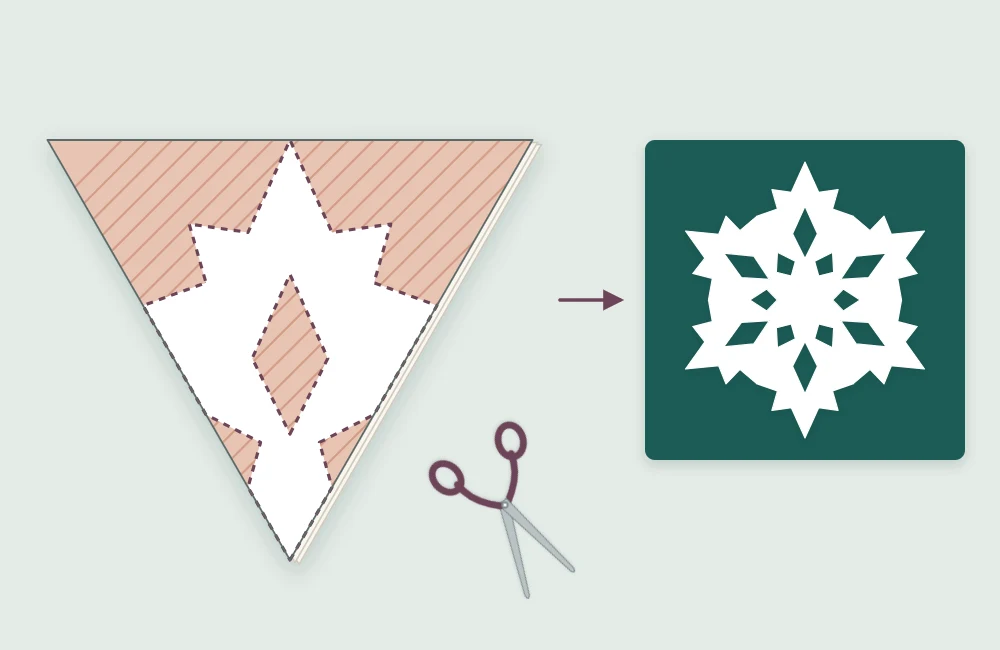
It helps to know what each part of the wedge becomes. The sharp point is the center of the snowflake. The wide end is the outer rim. The two long sides are folds, and any shape cut into a fold opens out as a mirrored pair: a half-diamond becomes a diamond, a half-heart becomes a heart.
Three rules keep the design in one piece and guarantee six points:
- Leave some of each folded side uncut. The folds are what hold the six sections together. Cut notches into both sides, but never let a cut run all the way from one side to the other.
- Shape the rim symmetrically. Cut the wide end to a single peak in the middle, or to a V notch that leaves a peak at each side. Either gives six points. A single slanted cut from one side to the other gives only three.
- Remove more than feels natural. A lacy snowflake has more open space than paper. Aim to cut away about half of the wedge.
Sketch the shapes lightly in pencil on the top layer before cutting.
Cutting and Unfolding
- Cut the rim first. Shape the wide end to a peak or a V notch. This removes bulk and makes the remaining cuts easier to reach.
- Cut the side notches. Work down each folded side, turning the paper into the scissors instead of twisting the scissors. Hold the layers firmly near the cut so they do not slide apart.
- Snip the tip. Cutting a tiny piece off the point puts a small hole in the center of the snowflake. Leave it uncut for a solid center.
- Erase and unfold. Rub out any pencil marks, then open the folds one at a time, slowly, easing apart any layers that have caught on each other.
- Flatten. Place the snowflake between two clean sheets of paper under a heavy book for a few hours.
Finer Detail and Other Sizes
For arms that are each perfectly symmetric, fold the 60° wedge in half lengthwise once more, to 30°. A cut pattern now repeats twelve times. The stack is twelve layers thick, so use thin paper, keep the shapes simple, and make several short snips instead of forcing one long cut.
Size changes the character of the result. A 4 in (10 cm) square makes a small, delicate snowflake for a card or a gift, and a group of three sizes always looks more natural than a row of identical ones. For interior detail too fine for scissors, a craft knife on a cutting mat reaches where blades cannot, and the methods in the guide to cutting silhouettes with a knife apply equally to a folded wedge of two or three layers.
Displaying Them
On a window, a small dab of removable adhesive at the center and at two or three points holds a snowflake flat without marking the glass. Hung from thread at different heights, snowflakes turn slowly in moving air, which suits a stairwell or a doorway. Several of them joined point to point along a thread make a light winter garland, and they sit well beside the strip spheres and folded baubles in the article on paper ornaments for the tree. For soft light on dark evenings, pair them with a few cut-paper lanterns lit by battery tea lights.
Frequently asked questions
How do you fold paper for a six-point snowflake?
Fold a square in half on the diagonal to make a triangle, mark the middle of the long folded edge, then fold the triangle into three equal sections around that mark. The result is a wedge with a 60° angle at its point, and every cut repeats six times.
Why does my snowflake have three points instead of six?
The wide end of the wedge was probably cut on a single slant from one side to the other. Cut it to a peak in the middle, or to a V notch with a peak at each side, and the unfolded snowflake will have six points.
Why did my snowflake fall apart when I unfolded it?
A cut ran all the way across the wedge from one folded side to the other. The folded sides hold the sections together, so leave part of each one uncut.
What is the best paper for cutting snowflakes?
Standard 20 lb (75 gsm) copy paper. It is thin enough to cut through six folded layers and stiff enough to hold its shape when displayed.