How to Make a Pop-Up Card: The Simple Box Mechanism
Two parallel cuts and three creases make a box that stands up when the card opens. Build a 4.25 × 5.5 in card with three stepped pop-ups and a clean cover.

Project at a glance
Materials
- Cardstock for the liner, cut to 8.25 × 5.25 in (21 × 13.3 cm)
- Cardstock for the cover, cut to 8.5 × 5.5 in (21.6 × 14 cm)
- Cardstock scraps for decorating the boxes
- Glue stick or double-sided tape
- A2 envelope, 4.375 × 5.75 in (optional)
If you want to learn how to make a pop-up card, begin with the box mechanism. It is the oldest trick in paper engineering and the easiest to get right: two parallel cuts through a folded sheet, three creases, and a small platform steps forward when the card opens. Nothing is glued to make it move, and once you understand why it works you can change its height, width and number at will.
How the box mechanism works
Cut two parallel slits into the folded edge of a sheet and you create a tab that is still attached at both ends. Push that tab through to the inside so its center crease folds the opposite way from the card’s own fold, and it has nowhere to go but forward when the card opens. At a right angle it forms a neat box, one face upright and one face flat on top.
One measurement controls everything: the length of the cuts. A cut 1 in (2.5 cm) long produces a box that stands 1 in tall and 1 in deep. The distance between the two cuts sets the width of the box and can be anything you like.
There is one limit. When the card is closed, the tab lies flat inside and reaches twice the cut length from the fold. Keep each cut shorter than half the width of the folded card, or the box will poke out of the closed card.
Paper and sizes
The card has two parts: an inner liner that carries the pop-ups, and an outer cover that hides the holes the tabs leave behind. For the liner, 65 lb (176 gsm) cardstock is ideal, since it is stiff enough to stand yet easy to cut through two layers. The cover can be the same weight or a little heavier, up to 80 lb (216 gsm).
The finished card is a standard 4.25 × 5.5 in (10.8 × 14 cm), the same base size used in the beginner card-making guide, so it fits an A2 envelope. The liner is cut slightly smaller than the cover so that it nests inside without peeking past the edges.
Step by step: a card with three stepped boxes
- Cut the liner. Cut cardstock to 8.25 × 5.25 in (21 × 13.3 cm). Score across the middle at 4.125 in (10.5 cm) and fold it in half, giving a folded piece 4.125 × 5.25 in.
- Mark the cut positions. With the liner folded, lay it with the fold toward you. Measuring along the fold from the left edge, make light pencil ticks at 0.5, 1.5, 2, 3.25, 3.75 and 4.75 in (1.3, 3.8, 5.1, 8.3, 9.5 and 12.1 cm). These six ticks are the sides of three boxes, with half-inch gaps between them and at both ends.
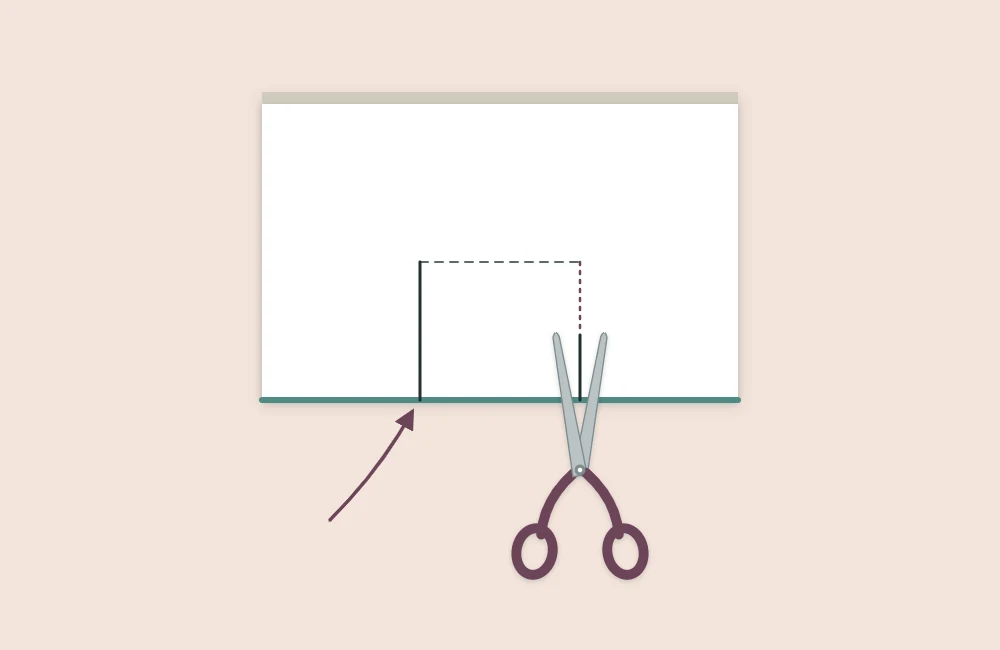
- Rule the cut lines. From each tick, draw a line straight up, square to the fold. Make the first pair 1 in (2.5 cm) long, the middle pair 1.5 in (3.8 cm) long, and the last pair 0.75 in (1.9 cm) long.
- Cut through both layers. Cut along all six lines, starting at the fold and stopping exactly at the end of each line. A craft knife against a metal ruler is the most accurate; scissors work if you cut slowly. See clean cuts with a craft knife if the two layers tend to shift.
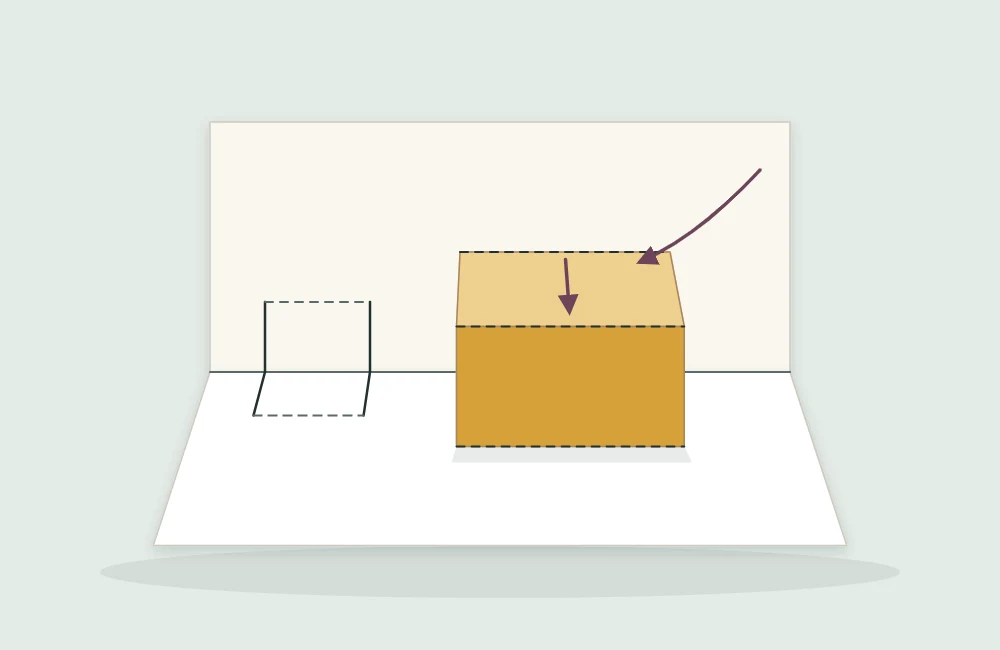
- Crease each tab. Lay a ruler across the ends of one pair of cuts and score between them. Fold the tab up along that line, crease it firmly, then fold it back the other way and crease again. Return it to flat. Repeat for the other two tabs.
- Push the tabs inside. Open the liner to a tent shape. With a fingertip behind the first tab, push it through to the inside, reversing its center crease so it points toward you while the card’s own fold points away.
- Set the folds. When all three tabs are through, close the liner carefully, check that each tab lies flat inside, and press along every crease with a bone folder. Open it again: three boxes should stand at different heights.
Adding the cover
- Cut and fold the cover. Cut a second piece of cardstock to 8.5 × 5.5 in (21.6 × 14 cm), score it at 4.25 in (10.8 cm) and fold. Scoring before you fold matters here, because a cracked spine is the first thing a recipient sees.
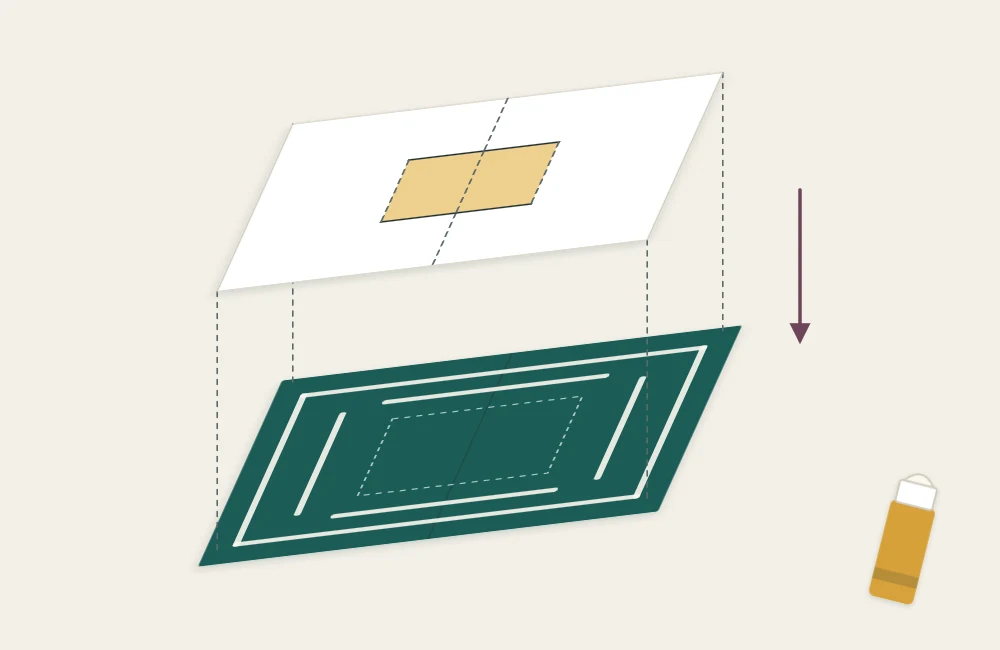
- Glue one half. Apply a thin layer of glue stick or strips of double-sided tape to the back of one half of the liner. Keep adhesive off the tabs themselves and at least 1/8 in (3 mm) away from the cut openings.
- Seat the fold. Nest the liner’s fold into the cover’s fold with an even margin showing on the three open sides, and press that half down.
- Glue the second half closed. Apply adhesive to the back of the other liner half, then close the cover over it and press. Gluing with the card shut lets the two layers find their natural position, so the card will not strain or buckle when opened.
Watch out
Put the adhesive on the liner, never on the cover. Glue spread on the cover shows through the openings behind the boxes, and any that reaches a tab will lock the mechanism shut.
Decorating the boxes
Each box is a small shelf with an upright face, and that face is where decoration goes. Cut shapes from cardstock — buildings, trees, gift boxes, simple numerals, abstract blocks of color — and glue them to the front face only, lining up the bottom of each shape with the bottom of the box. A shape can be wider and taller than its box, which is how three plain steps become a skyline or a row of presents.
Before the glue sets, close the card slowly. Any shape that reaches past the card’s edge when closed needs trimming.
If something goes wrong
- A box leans or twists. The two cuts are not the same length or not square to the fold. Recut on a fresh liner; this piece uses little paper.
- The card will not close flat. A tab was creased in the wrong direction, or adhesive has caught it. Free the tab and re-crease all three of its folds.
- The box collapses. The paper is too light. Move up to cardstock.
Variations to explore
Turn the card so the fold runs across the top and the boxes become a stage with a backdrop behind it. For a look at how far movable paper structures can go, the Movable Book Society is a good starting point. And when the card is finished, a handmade envelope cut to fit completes it.
Frequently asked questions
Why does my pop-up stick out when the card is closed?
The cuts are too long. When the card is closed, the tab lies flat and reaches twice the cut length from the fold, so each cut must be shorter than half the width of the folded card. On a liner 4.125 in wide, keep cuts under 2 in.
What paper is best for pop-up cards?
Medium cardstock of about 65 lb (176 gsm) is a good balance: stiff enough for the boxes to stand, and thin enough to cut cleanly through two layers. Ordinary printer paper tends to collapse.
Do I need glue to make the pop-up work?
No. The box mechanism is cut and folded from the liner itself, so it moves without any glue. Adhesive is used only to attach the cover and any decoration on the front of the boxes.