Layered Paper Art: Build a Shadow-Box Landscape
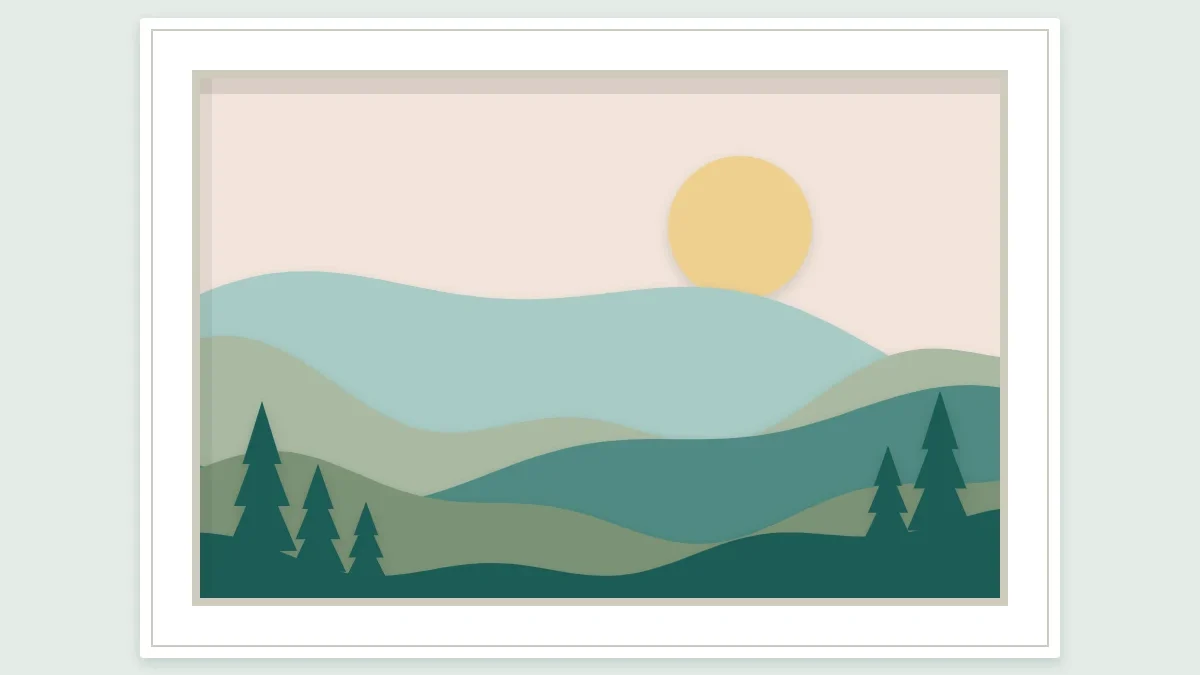
A sky, five paper hills and a few strips of foam tape: a first shadow-box landscape with real depth and soft shadows.
Project at a glance
Materials
- 6 sheets of 65 lb (176 gsm) cardstock in graded tones
- Double-sided foam tape, about 1/8 in (3 mm) thick
- Glue stick or double-sided tape
- Shadow-box frame with an 8 × 8 in (20 × 20 cm) backing board and at least 3/4 in (2 cm) of depth
Stack a few sheets of paper with a small gap between each and something useful happens: every edge casts a shadow onto the sheet behind it, and a flat design gains real depth. That is the whole idea behind layered paper art. A landscape of rolling hills is the classic first subject because it forgives almost everything. The curves are cut freehand, no two ridges need to match, and the receding layers imitate the way distant hills fade in real life.
The idea of building a scene from paper planes set one behind another is an old one; the Victoria and Albert Museum holds a collection of paper peepshows that work on a related principle. The version here is far simpler: a sky, five hills, and a shadow-box frame.
Start with the frame, not the paper
Buy or find the shadow box before cutting anything, and measure two things: the size of the backing board that sits inside it, and the depth available between that board and the glass. The measurements below assume an 8 × 8 in (20 × 20 cm) backing board and at least 3/4 in (2 cm) of depth. If your frame is a different size, keep the proportions and adjust the numbers.
Depth decides how many layers will fit. Each layer here sits on foam tape about 1/8 in (3 mm) thick. Five foam layers add up to 5/8 in (1.6 cm), plus the thickness of six sheets of cardstock. In a shallower frame, use thinner foam tape or drop to three hills.
Color: light at the back, dark at the front
Distant hills look paler and less saturated than nearby ones. Reproduce that and the scene reads as deep even before the spacers go in. Choose five tones of one color family, running from very pale at the back to dark at the front, with a sky that is paler still or a soft contrasting tint. Blue-grays, sage greens and dusty terracottas all work. Smooth 65 lb (176 gsm) cardstock is ideal: stiff enough to stay flat across the frame without sagging between spacers.
Lay the sheets out in order and squint at them. Each step in tone should be visible but not abrupt. If two neighbors merge, swap one out. This kind of tonal planning is the same judgment used in composing a paper collage, and practice in one helps the other.
Cut the layers
- Cut the sky. Cut one piece 8 × 8 in (20 × 20 cm). This is the only full-size layer.
- Cut five blanks. Cut five rectangles, all 8 in (20 cm) wide, at these heights from back to front: 6.75 in, 5.75 in, 4.75 in, 3.75 in and 2.75 in (about 17, 14.5, 12, 9.5 and 7 cm). Number them lightly on the back, 1 for the tallest through 5 for the shortest.
- Draw the ridge lines. On the back of each blank, draw a flowing line across the top. Let it rise to the top edge in one or two places and dip no more than 3/4 in (2 cm) below it. Keeping every dip within that limit guarantees each hill still shows above the one in front.
- Vary the rhythm. Put the high point of each ridge in a different place from its neighbors: left on one, right of center on the next. Long, slow curves look more natural than a row of even bumps.
- Cut the curves. Cut along each ridge line with a craft knife in one continuous movement where possible, turning the paper rather than your wrist. Sharp scissors also work well on these gentle curves. For help with either tool, see the guide to cutting clean curves.
- Test the stack. Lay the layers on the sky, bottom edges and sides aligned, tallest at the back. Check that a band of every hill is visible. Trim any ridge that hides the one behind it.
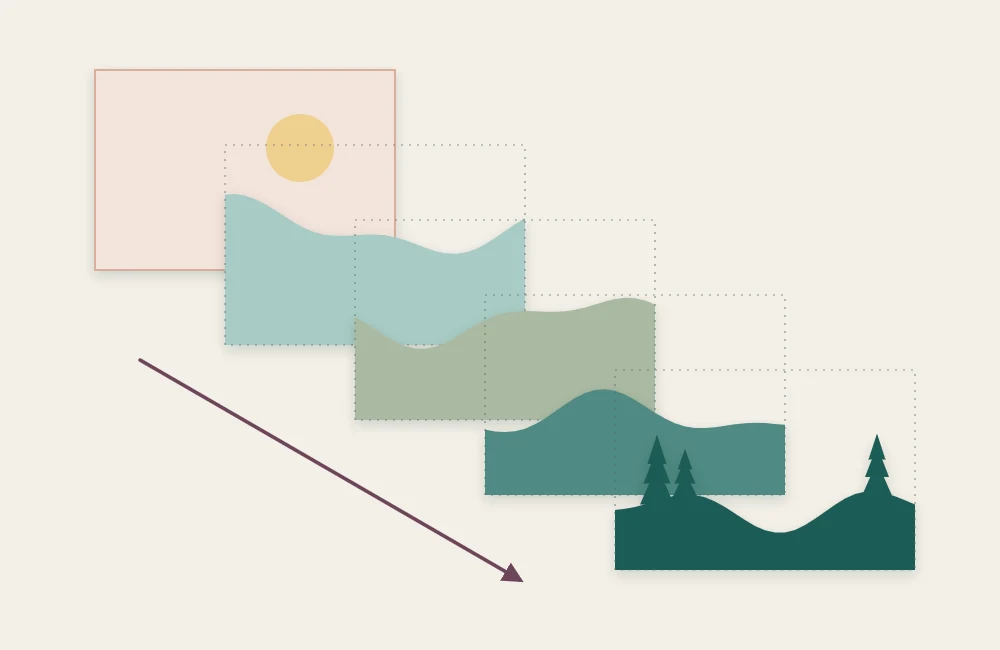
Add the spacers and build the scene
- Fix the sky. Glue the sky sheet flat to the frame’s backing board with a glue stick or a few strips of double-sided tape.
- Apply foam to the back of hill 1. Stick strips of foam tape along the bottom and both sides of the back of the tallest hill, plus one or two short pieces in the middle. Keep all foam at least 1/2 in (1.3 cm) below the ridge line so it cannot be seen from an angle.
- Position and press. Peel the backing from the foam, line the hill up with the bottom and side edges of the sky, and press it down.
- Repeat for hills 2 to 5. Add foam to the back of each layer in turn and stack it on the one before, always aligning the bottom and sides. On the shorter layers, the foam simply sits lower.
- Frame it. Clean the inside of the glass, check for stray specks on the paper, and close the frame.
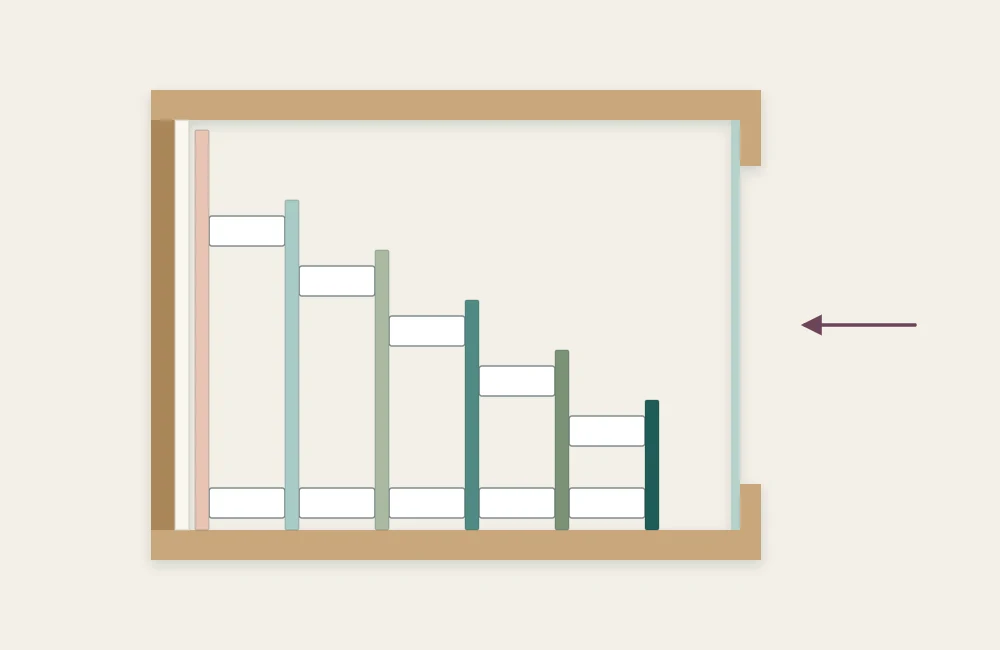
Watch out
Foam tape bonds almost instantly and rarely lifts without tearing the paper. Do a complete dry run of the stack first, and lower each layer into place from the bottom edge upward so you can correct the alignment before the foam grabs.
Reading the result
Hang or stand the finished box where light reaches it from above or from one side. The shadows under each ridge are what make the piece, and they vanish in flat, frontal light. If the layers look flatter than expected, the tones are probably too similar, or the spacers too thin for the size of the frame.
Two other faults are common. Edges that do not line up at the sides usually mean the blanks were not all cut to exactly the same width. A layer that bows forward in the middle needs an extra piece of foam behind it.
Taking it further
- Add a sun or moon. Glue a paper circle directly to the sky before the first hill goes on, partly hidden behind the ridge.
- Change the subject. The same structure makes waves, dunes, a city skyline or a forest edge. Only the cut line changes.
- Introduce detail. A front layer cut as a silhouette of trees or grasses adds a focal point. The approach to bridges and connected shapes in papercut silhouette design applies directly.
- Vary the gaps. Doubling the foam behind the front layer pushes it forward and exaggerates the depth.
Once the hills are comfortable, the format rewards a slower second attempt: more layers, closer tones, and a ridge line drawn from a place you know. For relief without a frame of spacers, the raised pyramids in this geometric paper wall piece get their depth from scoring alone.
Frequently asked questions
How deep does the shadow box need to be?
For five layers on 1/8 inch (3 mm) foam tape, allow at least 3/4 inch (2 cm) between the backing board and the glass. In a shallower frame, use thinner foam or fewer layers.
What can I use instead of foam tape?
Small squares of foam board or stacked strips of corrugated cardboard, glued on both sides, do the same job. Keep every spacer in one layer the same thickness so the paper stays flat.
Should the darkest layer go at the front or the back?
Darkest at the front is the usual choice for a landscape, because distant hills look paler in real life. Reversing the order gives a different, more graphic effect and is worth trying.