Paper Quilling for Beginners: Basic Shapes and a First Design
Learn to roll an even coil, pinch it into the five basic quilling shapes, and assemble a small six-point medallion.
Project at a glance
Materials
- Quilling strips, 1/8 in (3 mm) wide, in one or two colors
- Clear-drying PVA glue with a fine nozzle, or a toothpick for applying it
- Cardstock square, 4 × 4 in (10 × 10 cm), for mounting
Quilling is the craft of rolling narrow strips of paper into coils, pinching those coils into shapes, and gluing them on edge to form a design. Paper quilling for beginners comes down to one skill, rolling an even coil, plus a handful of pinches that turn that coil into everything else. The materials are inexpensive, the work fits on a tray, and the repetition is absorbing in the way knitting or hand-sewing can be. This guide covers the five basic shapes and then puts them to use in a small six-point medallion.
What you need, and what you can improvise
Pre-cut quilling strips are the easiest way to start. The common width is 1/8 in (3 mm), and it is the one to buy first. You can also cut your own from text-weight paper of roughly 100 to 120 gsm using a knife and metal ruler, though keeping dozens of strips to exactly the same width takes care. Cardstock is too stiff to roll smoothly, and thin copier paper makes limp coils.
A slotted quilling tool is a handle with a split metal tip that grips the end of the strip. It makes rolling far easier, at the cost of a tiny crimp in the center of each coil. A toothpick or a large needle works too, with a little more practice. Beyond that you need fine-tipped tweezers, PVA glue in a bottle with a narrow nozzle, or a puddle of glue and a toothpick to apply it, and a sheet of cardstock to mount the finished piece. If you already own basic paper craft tools, only the slotted tool is new.
Rolling a coil
Slide the very end of a strip into the slot. Turn the tool, not the paper, guiding the strip with your other hand so the edges stack evenly and the tension stays light and steady. When the strip is used up, tip the coil off the tool.
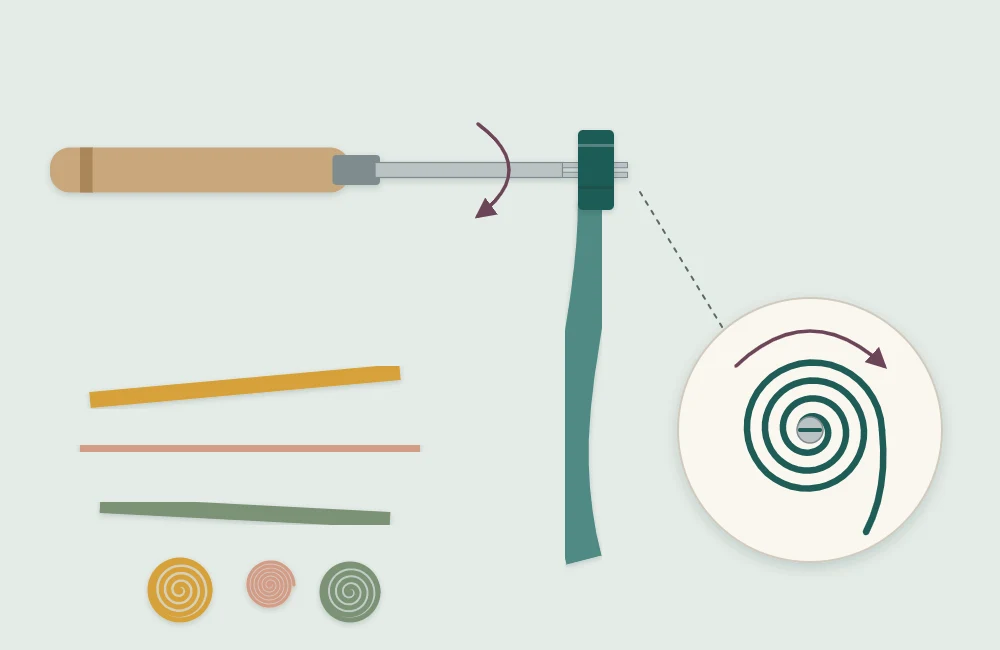
What happens next decides the shape. Glue the loose end down immediately and you have a tight coil. Let the coil sit on the table and it springs open; glue the end once it has relaxed and you have a loose coil, the starting point for every pinched shape.
Tip
To make loose coils the same size, draw a circle on scrap card, or use a circle stencil, and let each coil open inside it before gluing the end. A 1/2 in (1.3 cm) circle suits the project below.
The five basic shapes
| Shape | How to make it | Typical use |
|---|---|---|
| Tight coil | Roll the strip and glue the end before it can unwind. | Centers, dots, berries |
| Loose coil | Roll, release, let it expand, then glue the end. | Round fillers; the base for other shapes |
| Teardrop | Pinch one side of a loose coil to a point. | Petals, leaves, rays |
| Marquise | Pinch two opposite sides of a loose coil to points. | Leaves, eye shapes, borders |
| Square | Make a marquise, turn it a quarter turn, and pinch two more points. | Geometric patterns, tiles |

When pinching, hold the coil between the thumb and forefinger of one hand and pinch with the other, so the spiral inside stays centered. Pinch the point at the glued end where possible; it hides the seam.
A first design: the six-point medallion
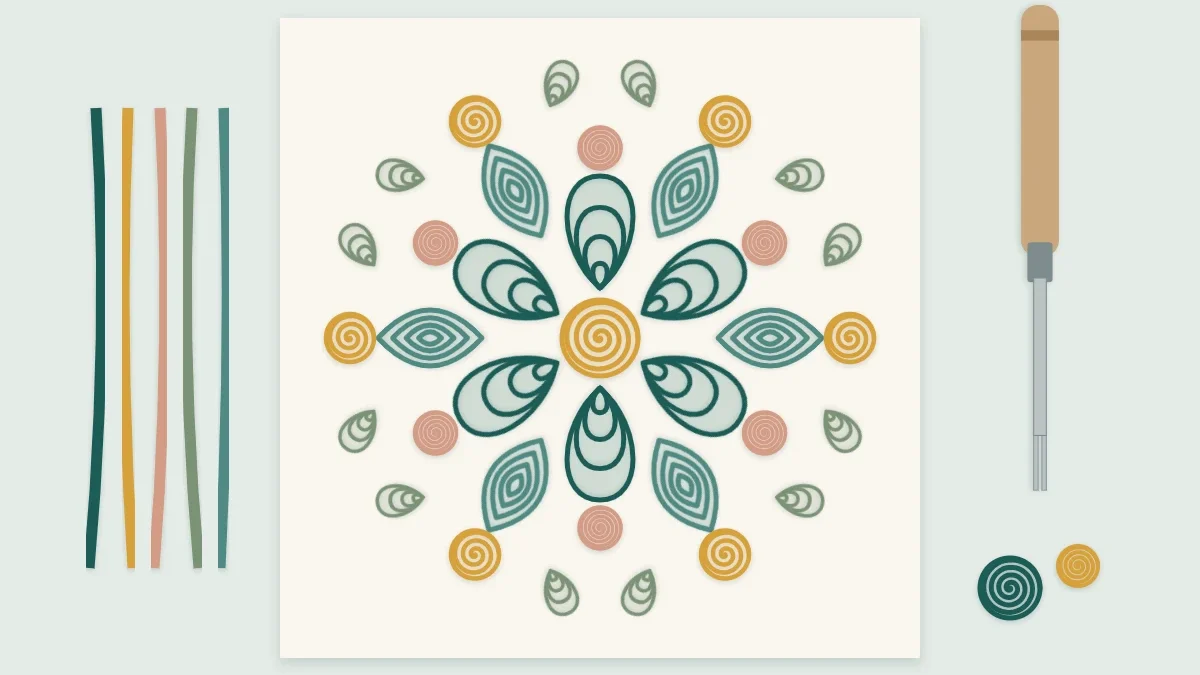
This motif uses thirteen pieces: one tight coil at the center, six teardrops radiating from it, and six small tight coils between the tips. Expect it to finish at about 2 in (5 cm) across, though the exact size depends on how loosely you let the coils open. Use one color for the teardrops and a second for the coils, or keep everything in one tone.
- Cut the strips. From 1/8 in (3 mm) strips, cut seven lengths of 8 in (20 cm) and six lengths of 4 in (10 cm).
- Roll the center. Roll one 8 in strip into a tight coil and glue the end.
- Make six teardrops. Roll each remaining 8 in strip, let it open to about 1/2 in (1.3 cm) across, glue the end, and pinch one side to a point.
- Roll six small coils. Roll each 4 in strip into a tight coil and glue the end.
- Mark the layout. On a 4 × 4 in (10 × 10 cm) square of cardstock, mark the center with a faint pencil dot. If it helps, draw three light lines through the dot at 60° to one another as guides for the six teardrops.
- Glue the center coil. Touch a little glue to the underside of the tight coil and set it on the dot.
- Add the teardrops. With tweezers, dip the lower edge of each teardrop lightly in glue and place it with its rounded end against the center coil and its point facing outward. Set opposite pairs first; it keeps the spacing even.
- Add the small coils. Place one small tight coil in each gap between neighboring teardrops, near their outer ends.
- Leave it alone. Let the piece dry flat for at least thirty minutes before moving it.
Glue: less than you think
Quilled pieces are glued on their edges, so the contact area is small and any excess shows as a shiny halo on the backing. Squeeze a small pool of glue onto a scrap and touch the shape to it, rather than applying glue to the card. A clear-drying PVA is the usual choice; the comparison of adhesives for paper crafts explains why it works well for edge-to-surface joins.
Why coils misbehave
- Coils of different sizes. Strip lengths vary, or some coils were given longer to relax. Measure the strips and use a circle guide.
- A coil that telescopes into a cone. The strip wandered off level while rolling. Guide the edge with a fingertip.
- A crushed center. Too much tension. The strip should slide through your fingers, not drag.
- An obvious seam. Tear the end of the strip instead of cutting it. A torn end feathers out and blends into the coil.
Where to take it next
A single medallion mounted on a folded card blank makes a restrained handmade card, and the guide to making your first card covers sizes and layout. Several medallions in a row suit a narrow frame. From here, try combining marquises and teardrops into leaf sprays, or outlining a simple shape and filling it with loose coils. The same rolling motion, at a larger scale and with recycled paper, is also the basis of coiled coasters made from magazine pages.
Frequently asked questions
Do I need a special tool to start quilling?
No. A toothpick or a large needle will roll a coil. A slotted quilling tool grips the end of the strip for you, which makes the first few sessions noticeably easier.
What width of quilling strip should a beginner use?
Start with 1/8 inch (3 mm) strips. It is the most widely used width and is easy to roll and pinch. Narrower strips are fiddly and wider ones suit more sculptural work.
Can I cut my own quilling strips?
Yes, from text-weight paper of roughly 100 to 120 gsm, using a craft knife and metal ruler. The strips must be the same width or the finished shapes will sit at different heights.
Why are my coils different sizes?
Usually because the strips are different lengths or the coils were left to relax for different times. Measure each strip and let every coil open inside the same circle guide before gluing the end.